We all know that posting consistently to Instagram is crucial to maintaining momentum and therefore growth.
However, this can be extremely time consuming.
Planning, creating and posting content on a regular basis can lead to burnout. This is why so many creators fail.
Luckily, there's a way around this endless cycle of posting.
Automatically uploading Instagram posts so you don't kill your own growth.
In this guide I'll show you how to shedule and automatically upload your Instagram posts safely in 2020 by not breaking Instagrams constantly changing rules.
Let's dive in:
Choosing the best Instagram scheduling app with an official Instagram Partnership.
You might of looked into a few different scheduling softwares. When deciding which one to use, there's some important factors to keep in mind.
- Instagram Partnership — this ensures that you can schedule posts and automatically upload them, so you don't have to manually do the posting.
- Unlimited posts per month — this is so that you can keep posting, without running out of posts.
If the scheduling service you use has an Instagram Partnership; that way Instagram has agreed for that service to connect to the Instagram Graph API — so you don't have to worry about breaking the Instagram Terms of Service.
In this guide we'll cover a few of the most popular options, which include:
1. Later — later.com
2. Buffer — buffer.com
3. Hootsuite — hootsuite.com
4. Tailwind — tailwind.com
5. Planoly — planoly.com
Let's start with our favourite choice, Later.com
In this section we'll go over how to use Later to schedule Instagram posts.
Why should you use later?
Well, Later has an official Instagram Partnership, free and paid plans and is trusted by over 600,000+ brands.

What great is that Later has a free plan which lets you:
- Schedule 30 Instagram posts per month (photos only)
- Preview your Instagram grid to ensure it looks good and is cohessive
- View their own version of Instagram analytics
- Plus lot's more...
You can see the various plans they offer here and what is included:
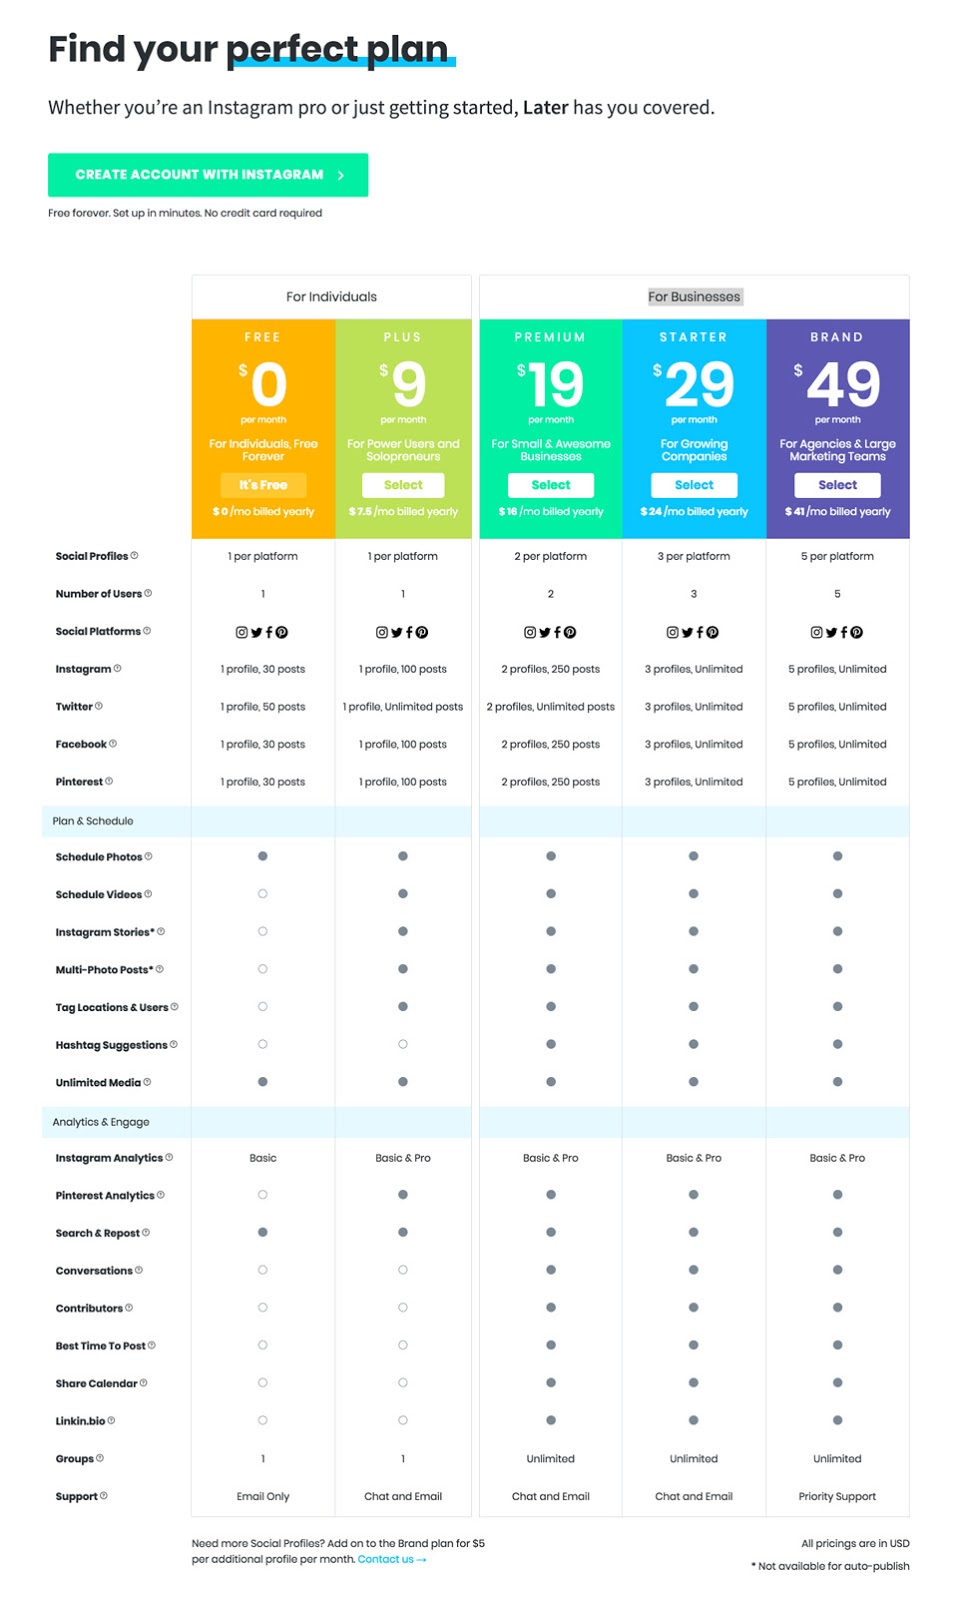
Of course, if you have the budget you can upgrade to a premium plan which starts at $9/month.
And with anything, you get fantastic features for the price you're paying:
- 100+ posts per month
- Location and user tagging
- Reposting, Instagram stories scheduling
- Pro Instagram analtyics
- And more...
How to automatically schedule your Instagram posts using Later.
Firstly you will need to create an account and link your Instagram to Later; then you can start scheduling posts.
Step 1: Create a Later account
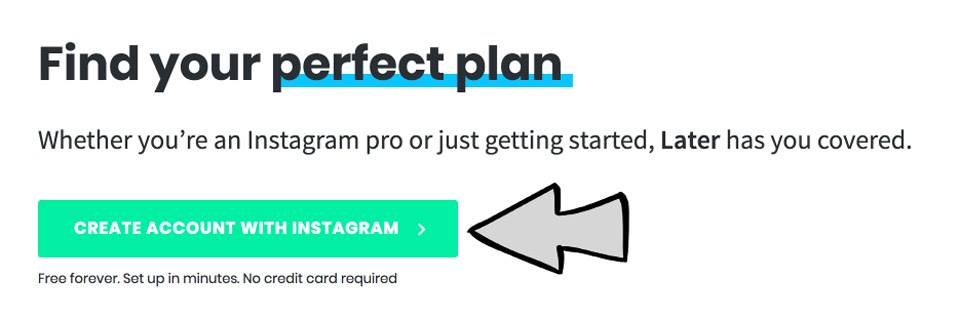
Head on over to Later.com and click on the big juicy green button that says "Create Account With Instagram" and follow the steps to setup an account.
Step 2: Connect your business account to Later to allow for automatic posting.
An important step...
Otherwise you won't be able to post automatically.
Login to Later and press Accept when they ask to authorize access to your Instagram account.

Next you want to connect your business profile as it doesn't do this automatically for you.
Click on "Settings" in the Later Dashboard.
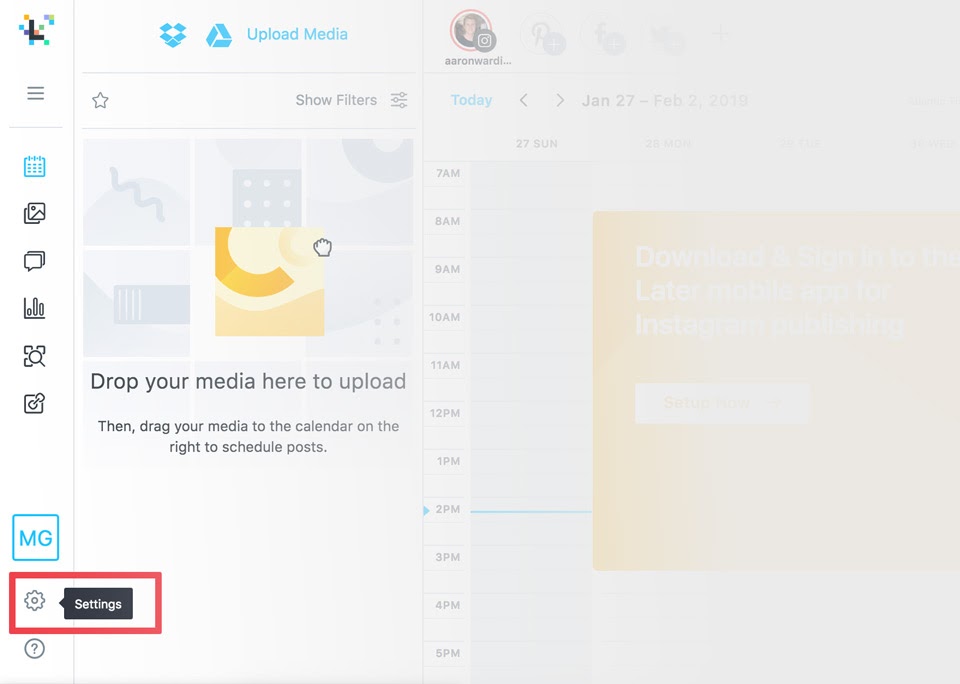
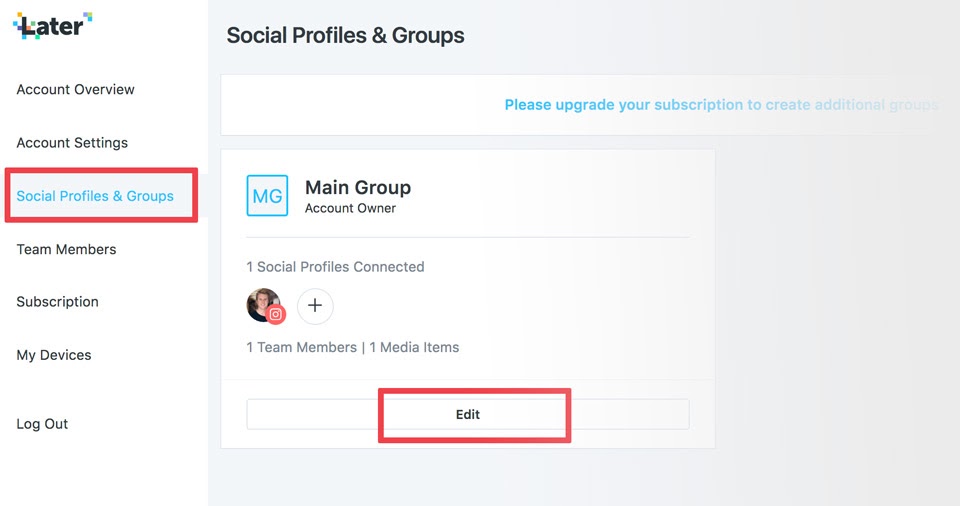
Click on "Social Profiles & Groups" in the sidebar, and then "Edit" on your connected Instagram account.
Finally, click on "Connect Business Profile" and follow the steps that show up.
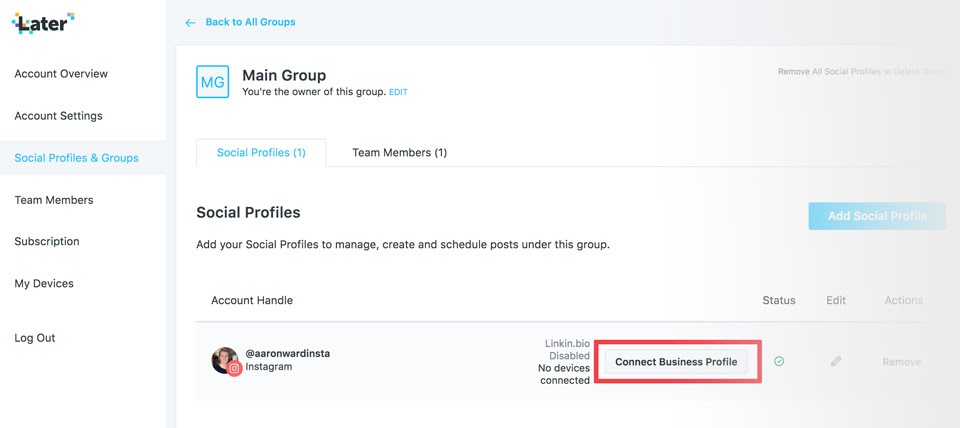
You've now connected Later to your business profile; this lets you automatically post!
Finally, head on over to the Later Dashboard and click on "Setup Now".
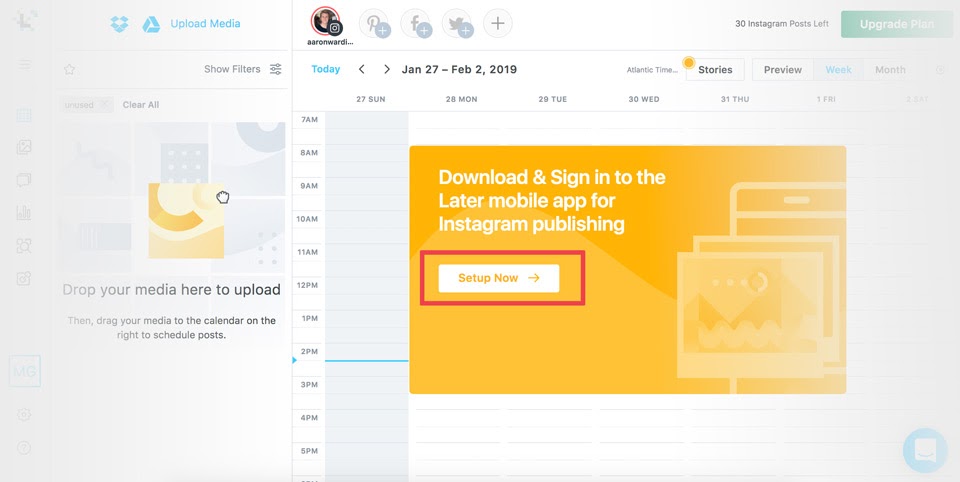
You will be taken through the steps of downloading the Later App to your phone so you can start scheduling posts.
Step 3: Schedule and automatically upload Instagram posts on Later.
To schedule a post using Later you will need at least 1 post which is ready to be uploaded.
Lets start:
On the left hand side of the Later Dashboard, you will want to drag in your posts to the media manager pannel.
You can see below I've done this for one image and also switched the Calendar view to Month on the right hand side (optional).
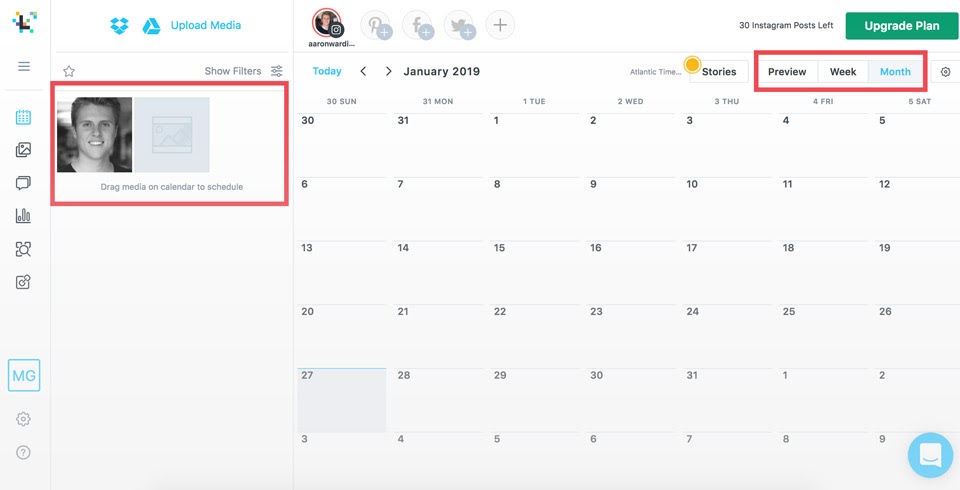
Later Dashboard in the Month View with one image uploaded to the Media Manager Panel.
After you've uplaoded your posts, you will want to drag your image or video from the Media Manager Panel to the day you want to upload on.
For example, I'll drag my image to be uploaded on the 29th of January.
Once you do this:
An interface will appear where you can choose your:
- Caption — tell people about whats happening in the photo or offer value.
- Hashtags — Include hashtags in your niche for people to discover you.
- Tag Users — Make sure to tag yourself as well as anyone else relevent to your image as it's another way people can discover you.
- Location — Tag the location you took this photo, even if its broad! It is another way for people to discover your account and increase your reach.
- Upload time — Choose your best upload time using your Instagram Insights which we discussed early.
- Upload type — You can choose to automatically upload your Instagram post or recieve a notificaiton on your phone where you manually post it.
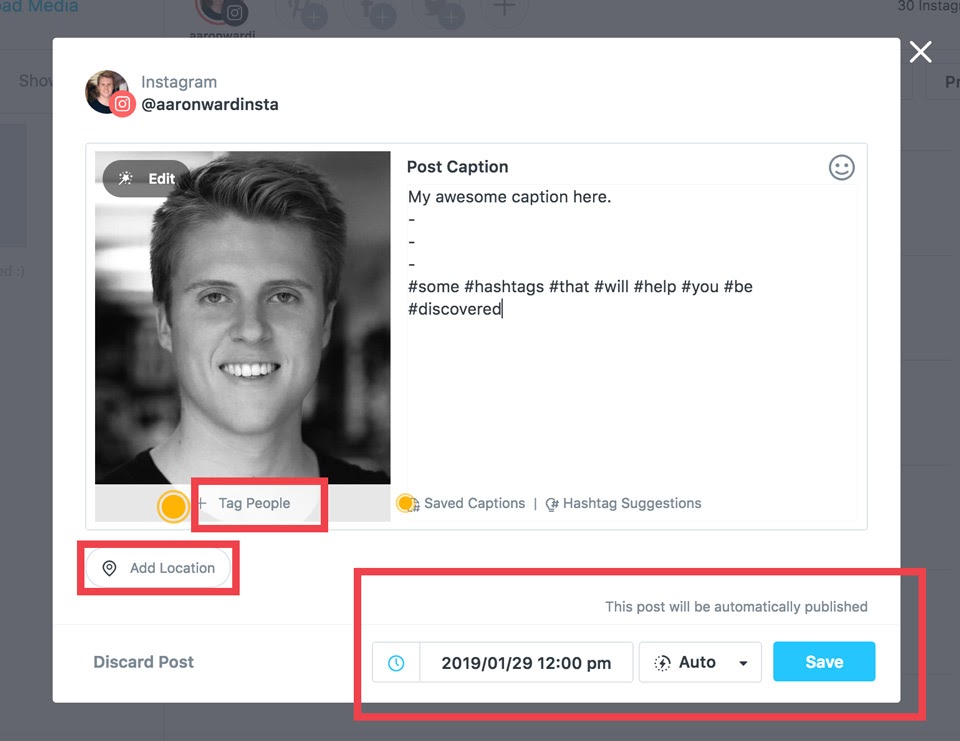
Example of a scheduled Instagram post using Later
You've now successfully scheduled a post which will be automatically uploaded to Instagram.
Now just repeat the process for other posts you have...
You'll never worry about having to be on your phone at a specific time, or from being banned due to using third party applications that are not an Instagram Partner.
Before we finish:
Other important features to mention that we didn't cover, which you should check out, is that you can:
- Edit your photos in the scheduling interface
- Use the Analytics tool in the left hand sidebar navigation
- Repost users content, also found in the left hand sidebar navigation
- Preview your feed by clicking on Preview in the Calendar Panel
Buffer
In this section, we'll guide you through how to use Buffer to schedule Instagram posts.

Scheduling your content in Buffer
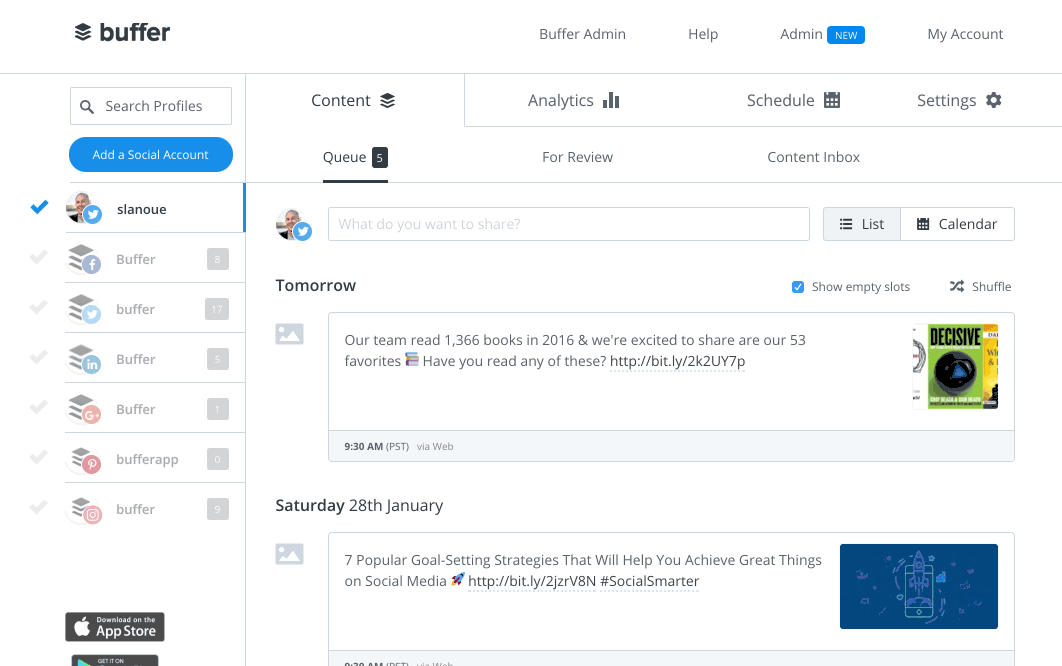
Scheduling your content in Buffer is simple.
Just add updates to your Buffer queue and it will be posted for you, well spaced out over the day – according to a posting schedule that you determine.
Once you’ve invited a team member to Buffer, they can start scheduling content right away. Here’s how:
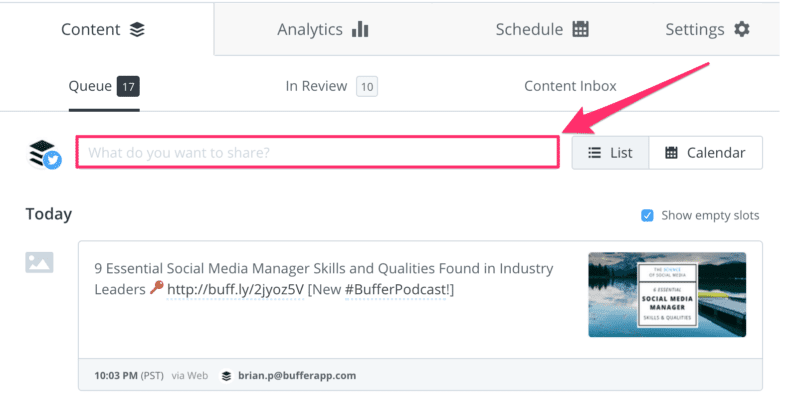
Step 1: Creating your post
To add a post to the queue, all you have to do is click inside the “what do you want to share?” box at the top of one of the profiles you have access to and either type in or copy/paste your post.
Step 2: Select which profiles to share the post to
Then choose which profiles you’d like to share the post to by selecting the avatars at the top.
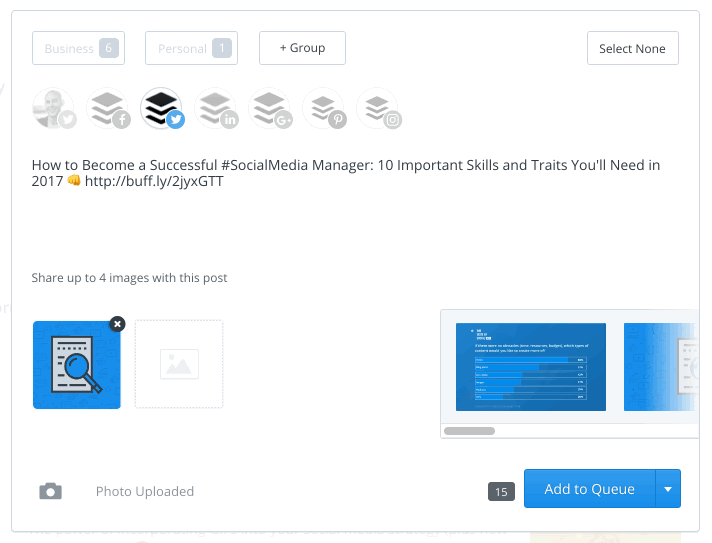
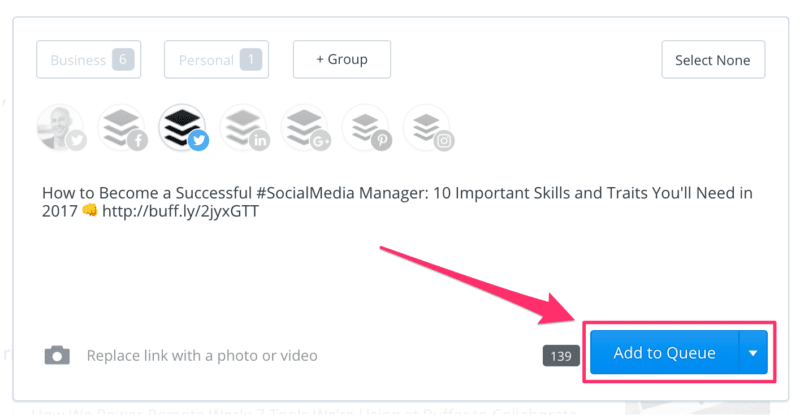
Step 3: Add your post to the Buffer queue
Once your post is ready, the next step is to click Add to Queue at the bottom right of the composer.
Note: If you set up a team member’s account with “Approval Required” access, any posts they submit will appear in the ‘For Review’ tab within the ‘Content’ tab until you (or another team member with full posting access) approves them.
And if you’ve granted a team member “Full Posting” access, any posts they add will go straight into the queue at the next available time slot according to the posting schedule.
Reviewing and approving posts with Buffer
Once you’ve invited your team to Buffer and your teammates start contributing posts, any posts from people who’ve been added with “Approval Required” access will show up in a review queue.
Anyone on your team with full posting access can review, edit, approve, or delete them before sharing to your social profiles.
Here’s how each option works:
1. Reviewing posts
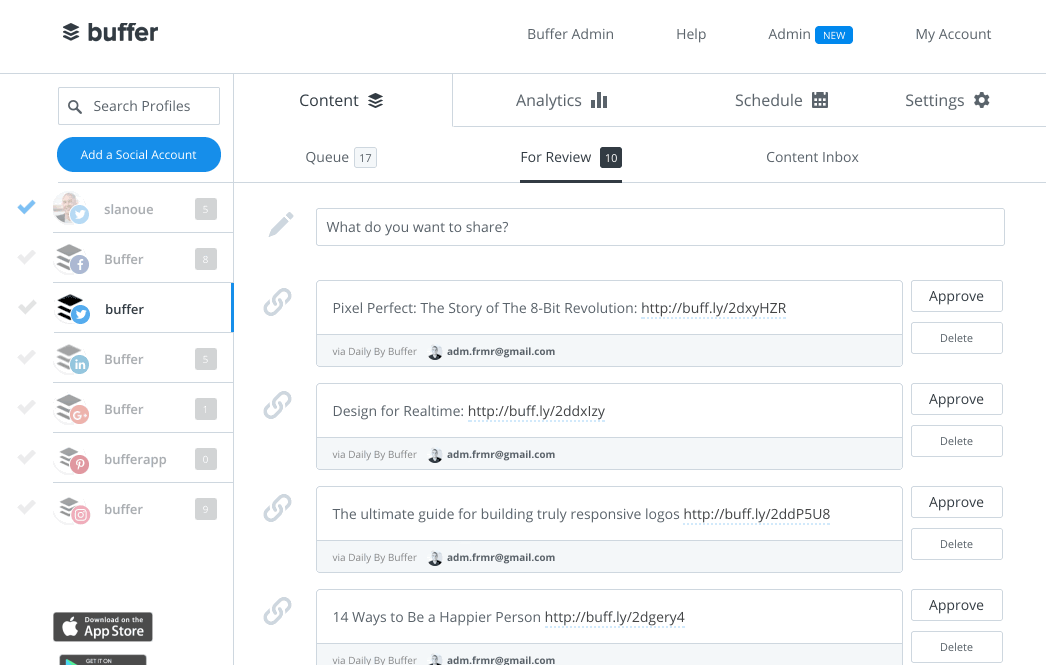
Any posts submitted by your team members that require approval will appear in the ‘For Review’ tab under ‘Content.’
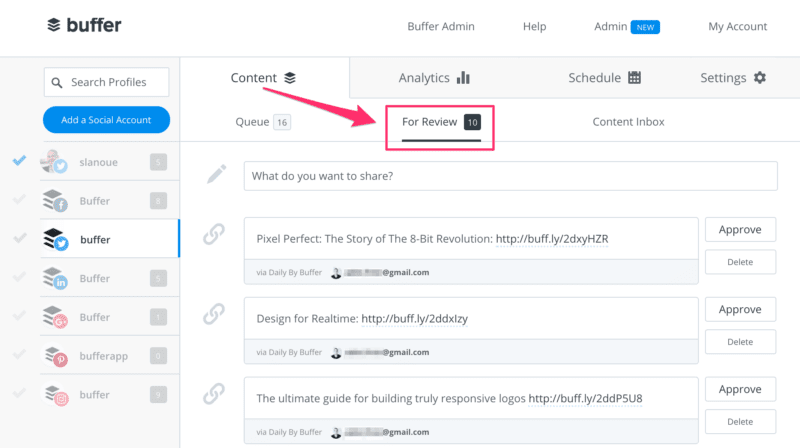
You and any team members who have full posting access will have the option to edit and approve posts before publishing – as well as delete those which you’d prefer not to share on your social media profiles. More on this below…
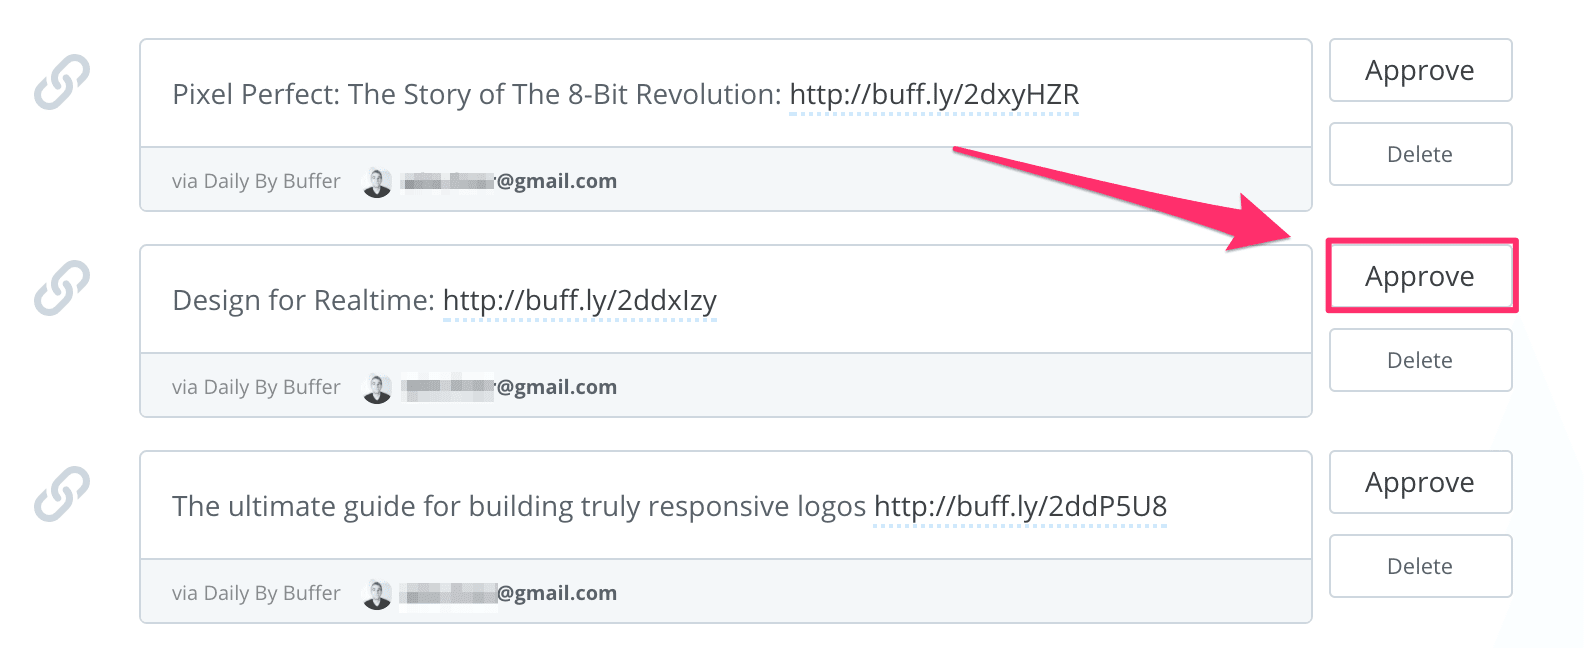
2. Approving posts
If you’d like to approve a post right away, click Approve. The post will be moved into the next available time slot in the queue.
Tip: If you’ve like to receive an email notification when a new contribution is submitted, click My Account at the top of your dashboard and select Email Settings from the drop down list. You’ll see a list of reminders that you can enable/disable. All you have to do is flip on the New Contributions option.
3. Editing posts
If you’d like adjustments to the post before adding it to the queue, hover over it and click Edit. From here you can change the text, link, or image – and then when you’re done, click Save and Approve.

4. Deleting posts
You also have the option to remove a post if it’s not one that you’d like to share to social media. Just click Delete to remove it from the list of suggested posts.

Customizing your posting schedules
Like we’ve talked about in previous sections, when you add posts to your Buffer queue, they’ll be sent out automatically – according to the posting schedule that you put in place for each social profile.
So how do you customize the dates and times for that posting schedule?
Step 1: Select a social media profile and click the ‘Schedule’ tab
Select the social account you’d like to customize the posting schedule for on the left-hand side of your dashboard.
Then select the Schedule tab at the top of the page.
Step 2: Customise the days and times your posts should go out
From here, you can do a few different things:
- Choose which timezone is best for this profile
- Customize the days and times you’d like your content to be shared
- Create a new posting schedule
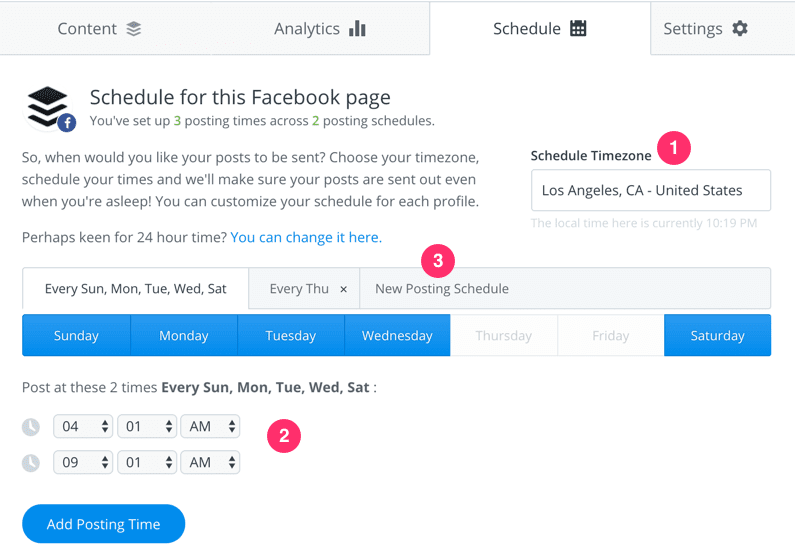
Note: On our Awesome and Business Plans you’re able to create multiple posting schedules. This is handy if you want to be sharing posts at different time on different days of the week.
Bonus: Check out the ‘Optimal Timing Tool’
Feel free to check out the Optimal Timing Tool, by clicking the link at the bottom of the Schedule page.
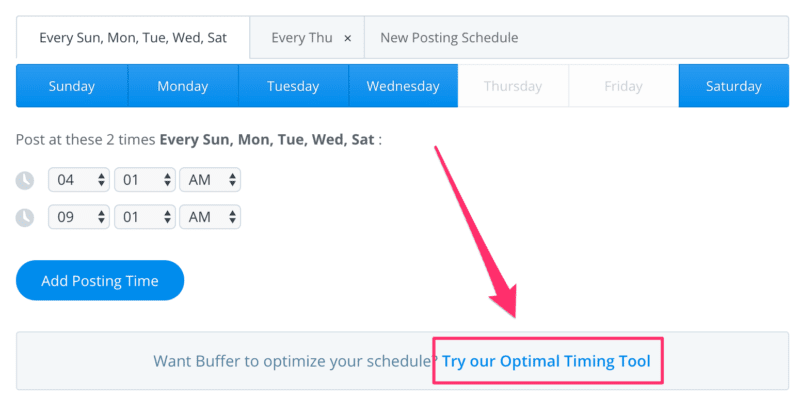
As you post via Buffer more and more, the tool will gradually learn what the optimal posting times are for each profile.
We’ve found timing to have a great impact on engagement so we recommend you revisit it every few weeks, especially while you’re starting out with Buffer.
How to schedule Instagram posts with Creator Studio
If you have a business or creator profile on Instagram, you can use Facebook’s native Creator Studio to craft and schedule your posts from your computer desktop.
For influencers with creator accounts, Creator Studio is actually the only place you can schedule your posts. Instagram designed this tool with influencers in mind, which means that its free, no-frills features are focused on ease of use for growth-oriented pros.
On the other hand, if you’re a brand with a business account — or simply a power user looking for some extra time-saving “frills” — you can choose between Creator Studio and any number of third-party tools with more robust, long-range features. (If this is you, skip to the next section.)
Follow these steps to use Creator Studio as an Instagram scheduler:
1. Link your Instagram account to Creator Studio
Head over to Creator Studio and follow the prompts (or use Facebook’s instructions) to link your Instagram to Creator Studio.
The steps will differ if your Instagram account is already linked to a Facebook page or not.
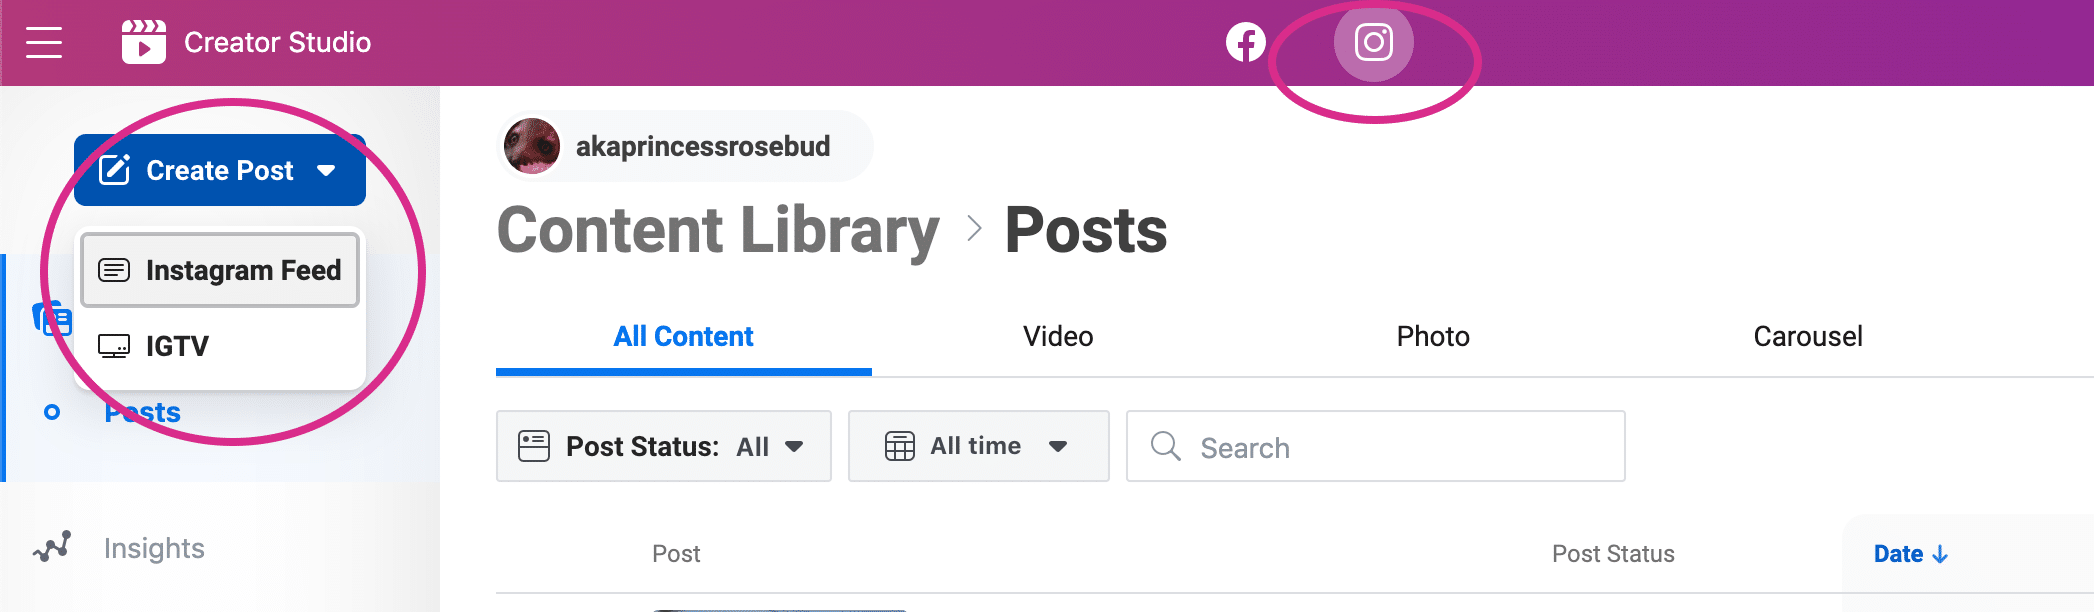
2. Click Create Post
Once you’re all set up, click the Instagram icon in the top bar, then click create post. Then click Instagram Feed.
Note that you also have the option to post to IGTV: here’s a separate guide on how to schedule your IGTV videos.
Pro Tip: Alas, it’s not possible to post or schedule an Instagram Story from Creator Studio. To do that, you’ll want to check out how to schedule Instagram Stories.
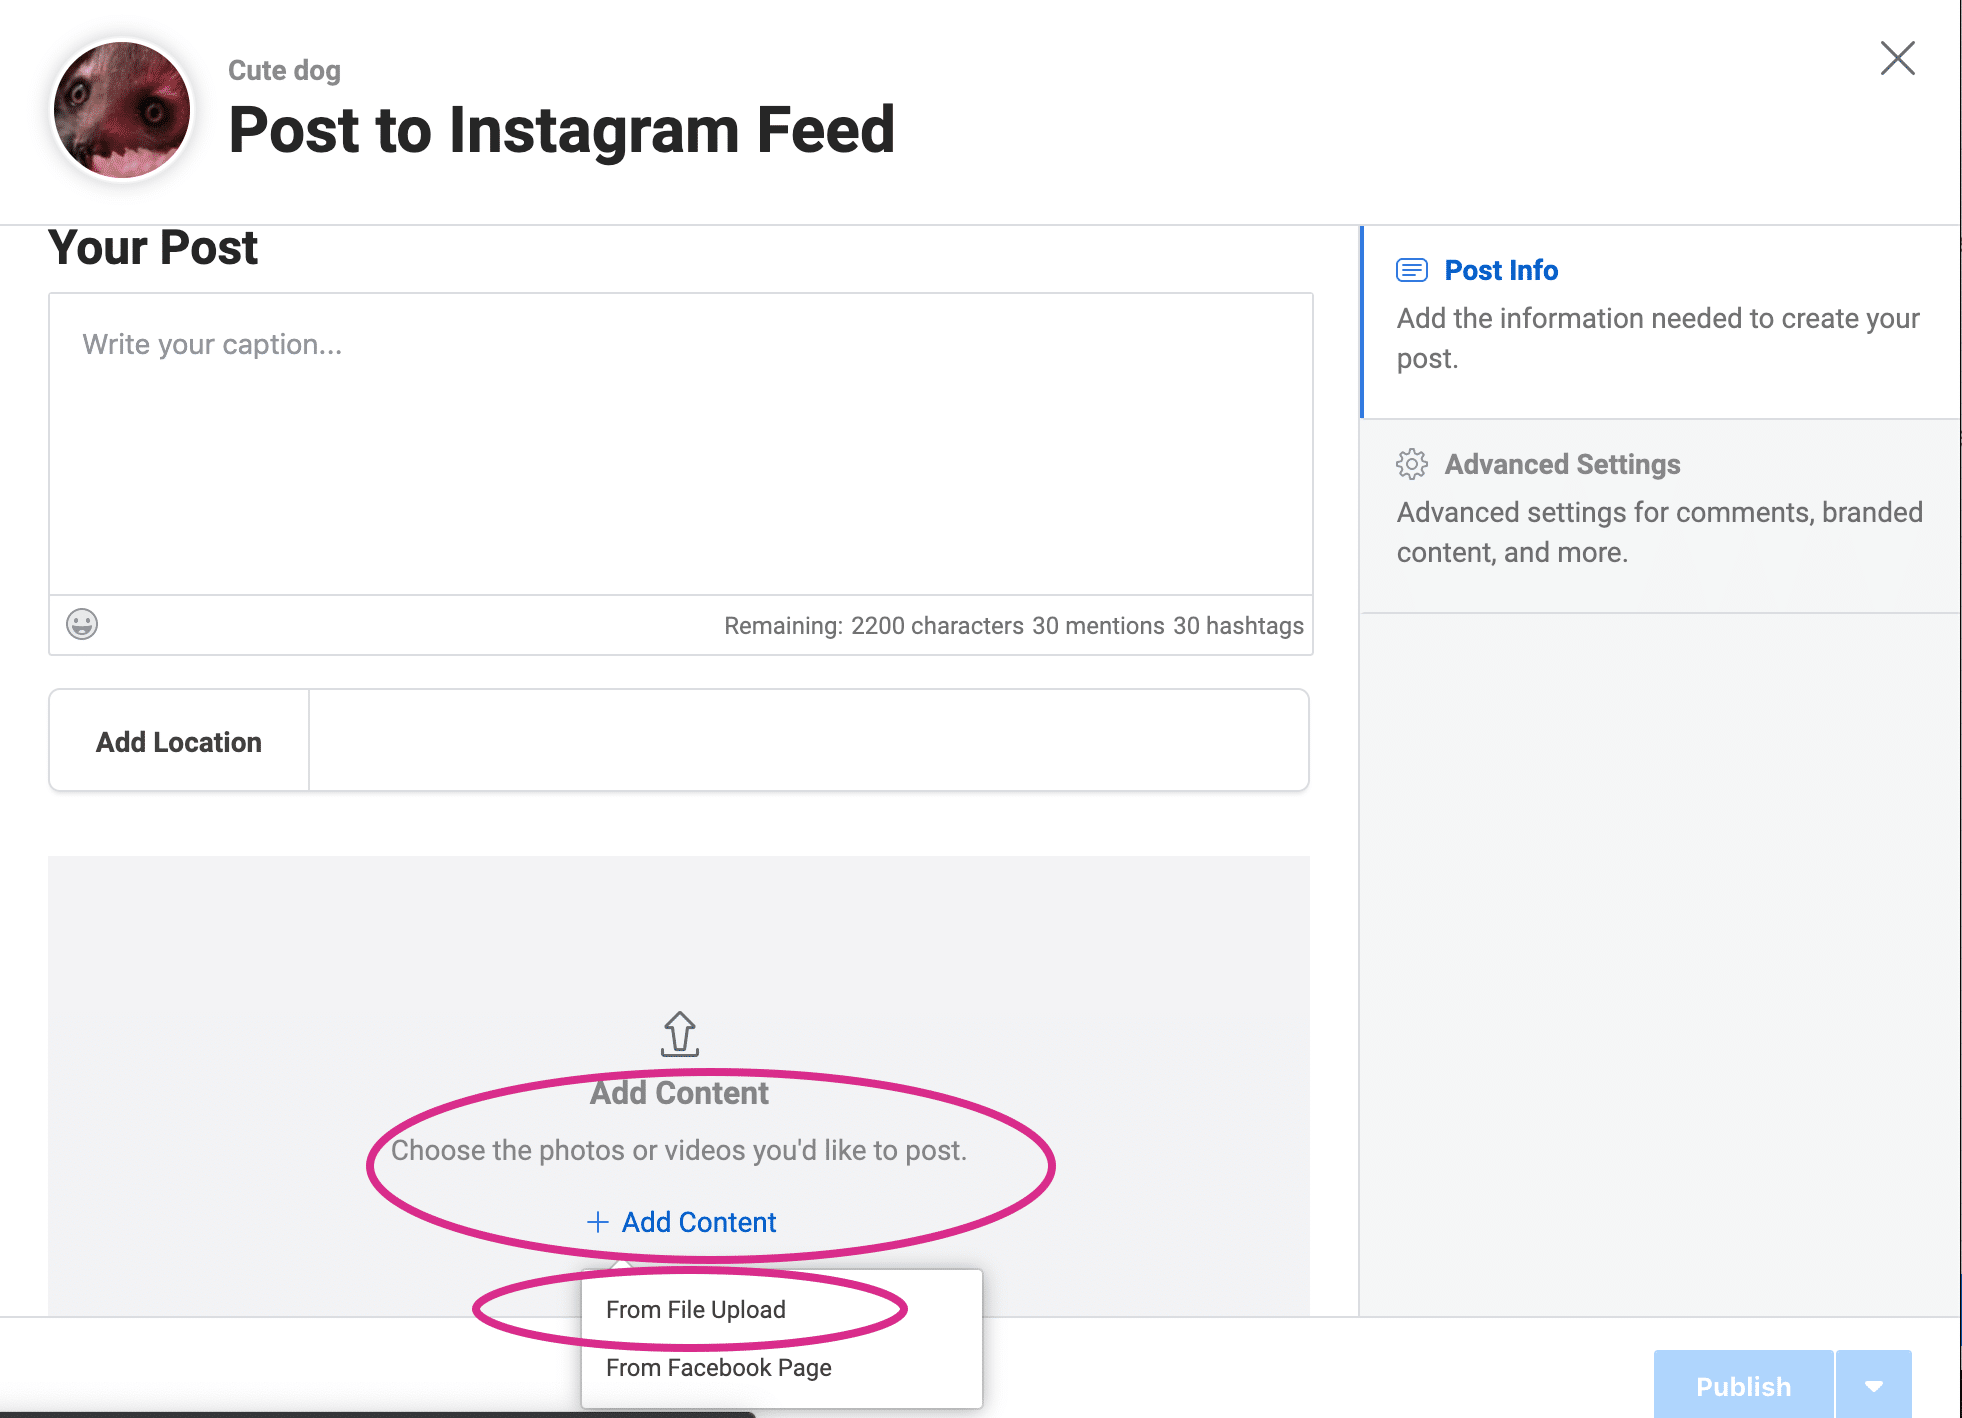
3. Upload your visuals
Now that you’re building your post, you can select a photo to upload as a post to your feed. (You can upload many and make a carousel post, and you can also upload video).
To do so, click the blue Add Content link in the grey box, and choose a file to upload (or else select a photo from Facebook to share.)
This is a good place for us to mention that there’s no content library in Creator Studio, so you won’t be able to store or manage your visual assets or templates here. (Depending on your workflow, this could be a massive inconvenience or a negligible one.)
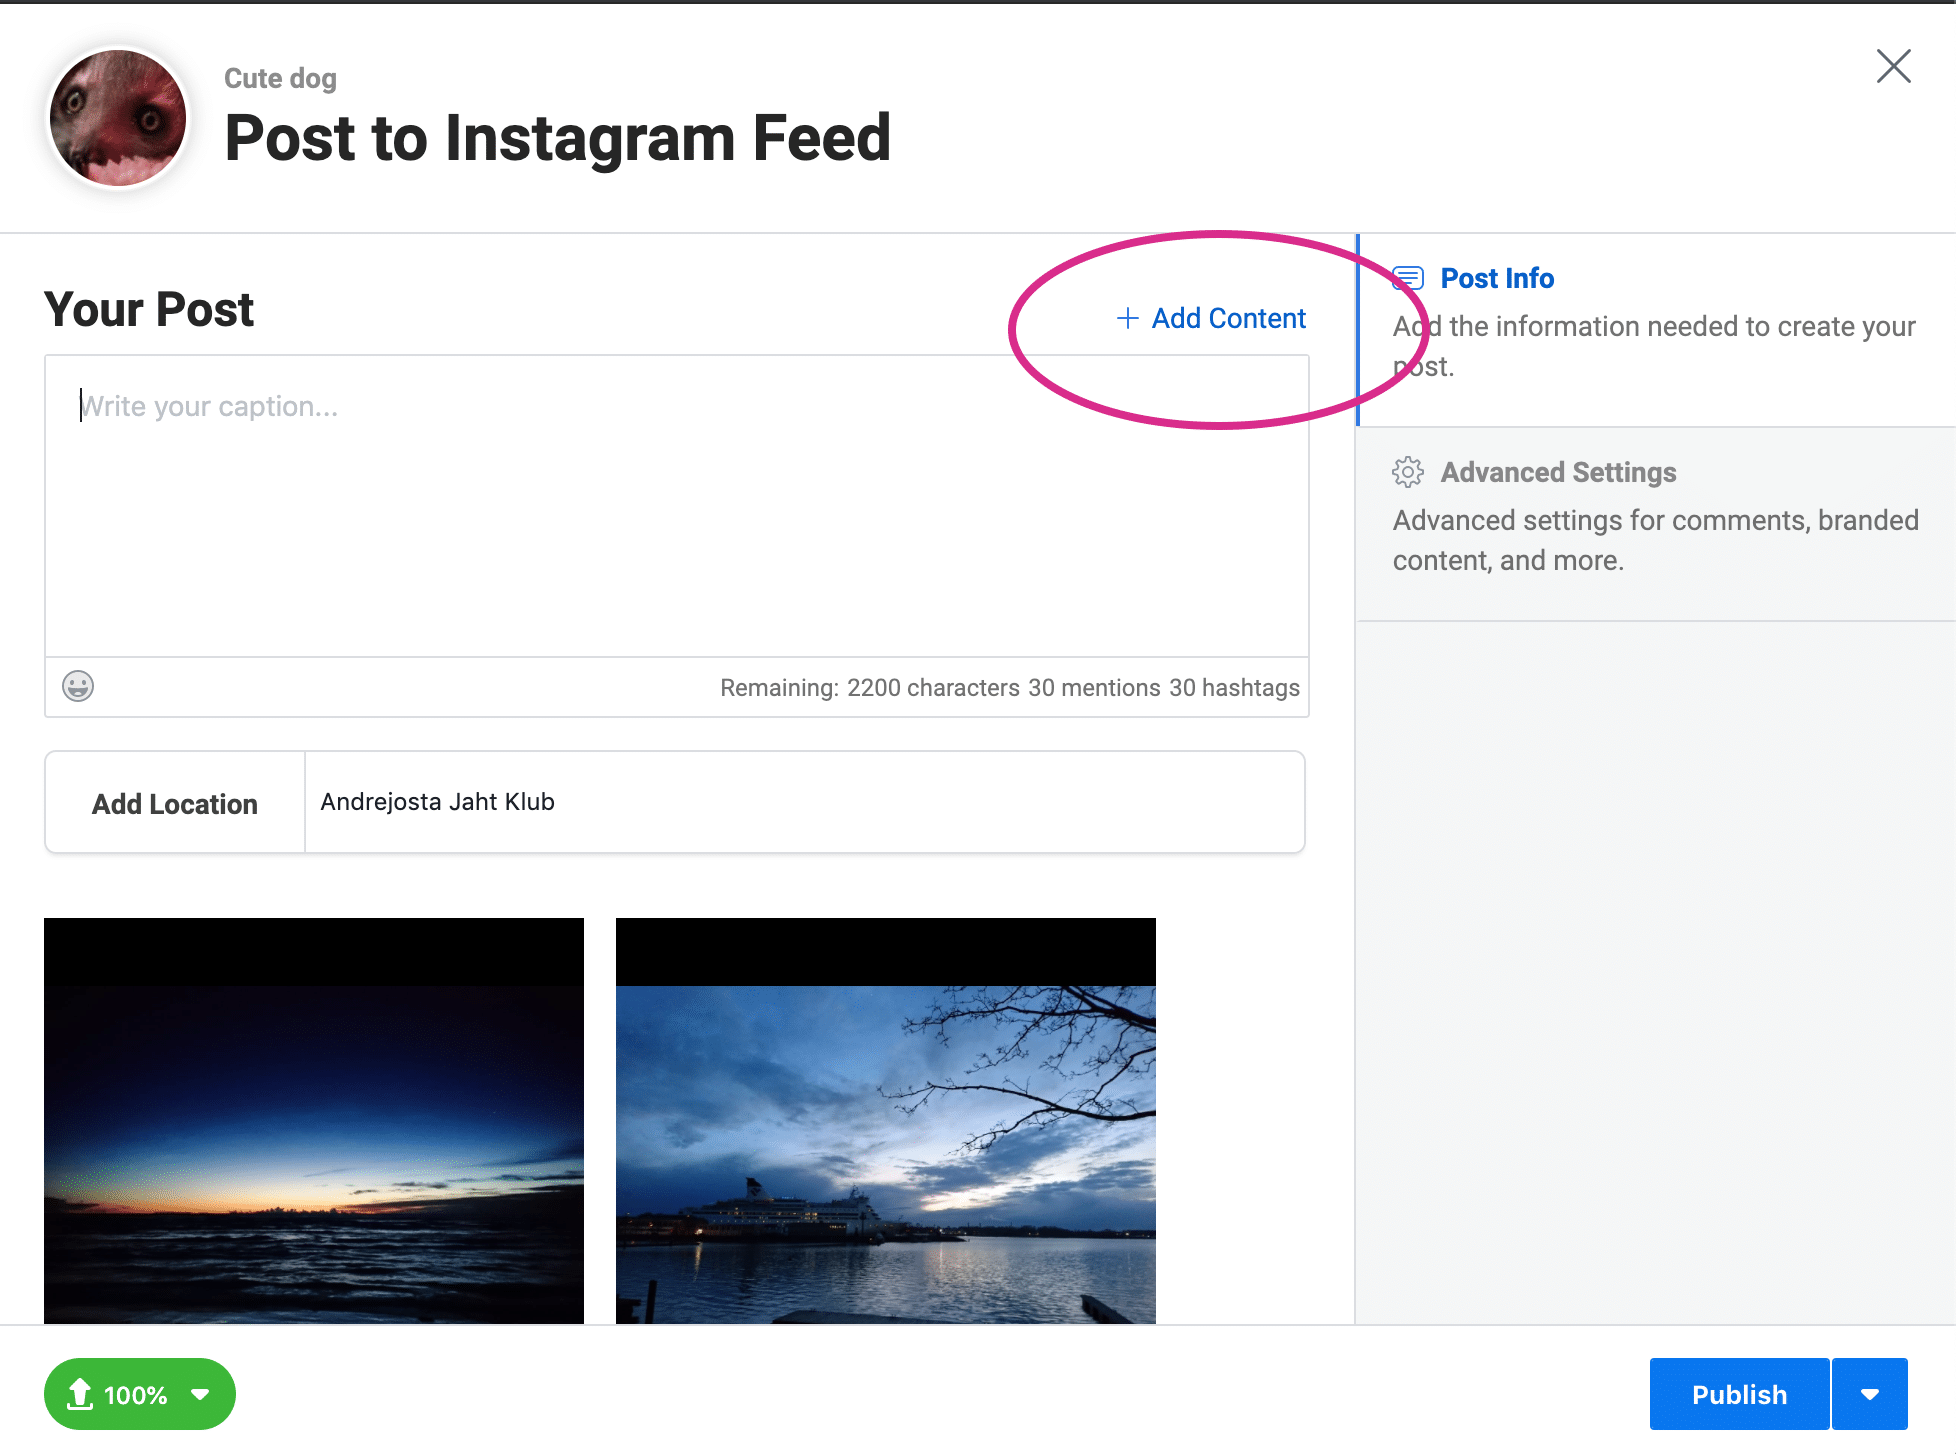
Also, if you want to add multiple photos or videos to make a carousel post, note that once you’ve uploaded one photo, the Add Content button moves to the upper right corner. Like this:
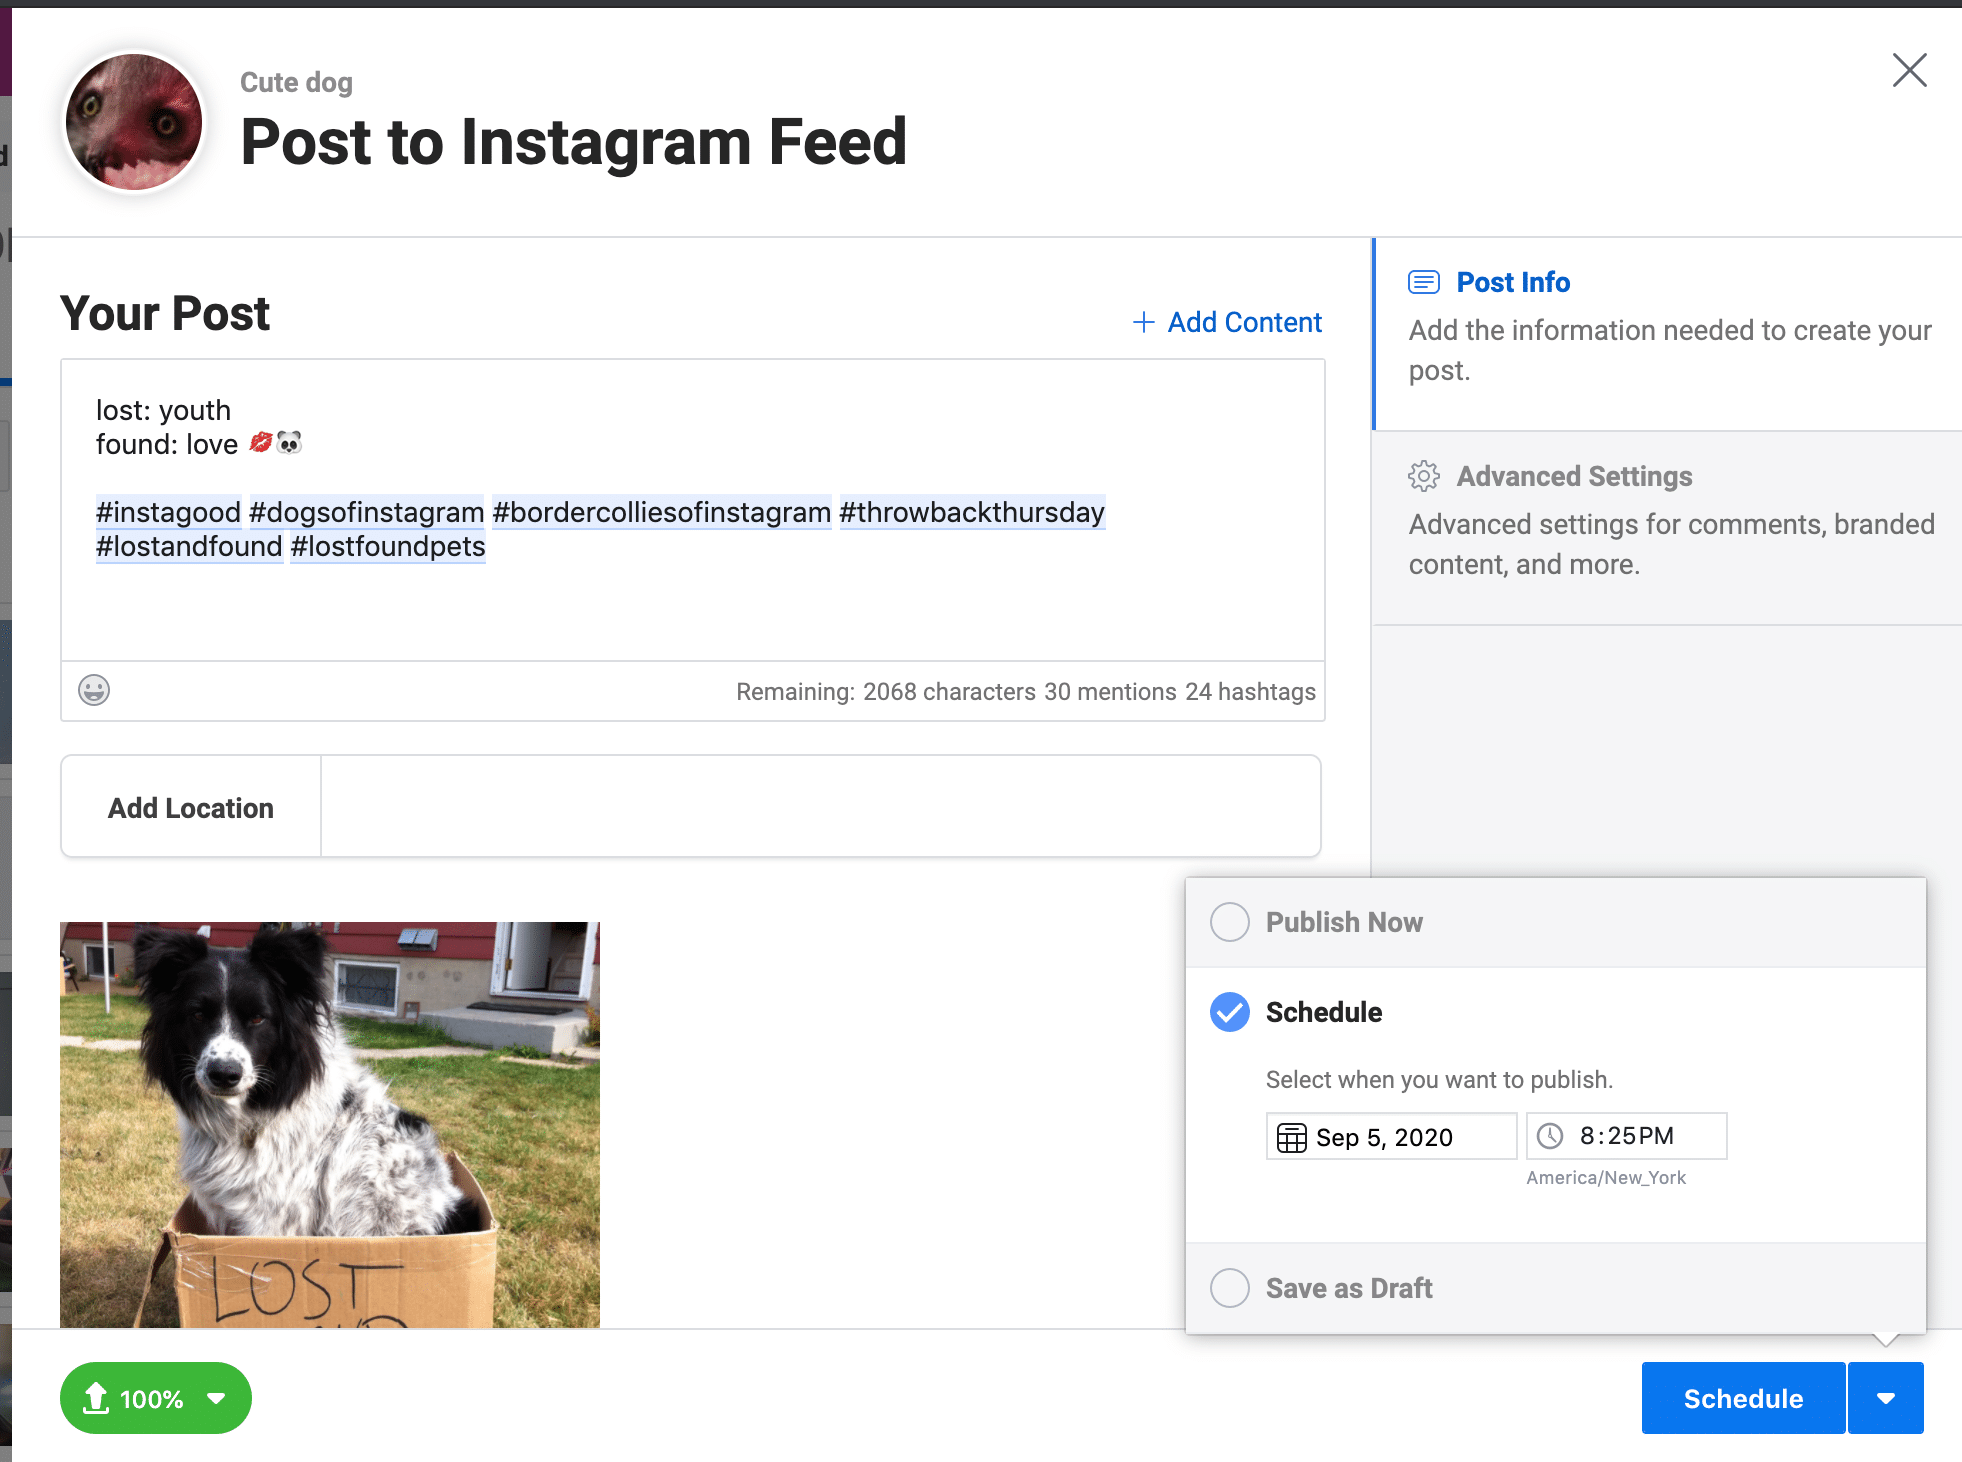
4. Craft your post
Now do your usual magic: write a good caption, use the right hashtags (up to 24 of them), tag relevant accounts (up to 30), and add your location.
You can use emojis, too, of course.
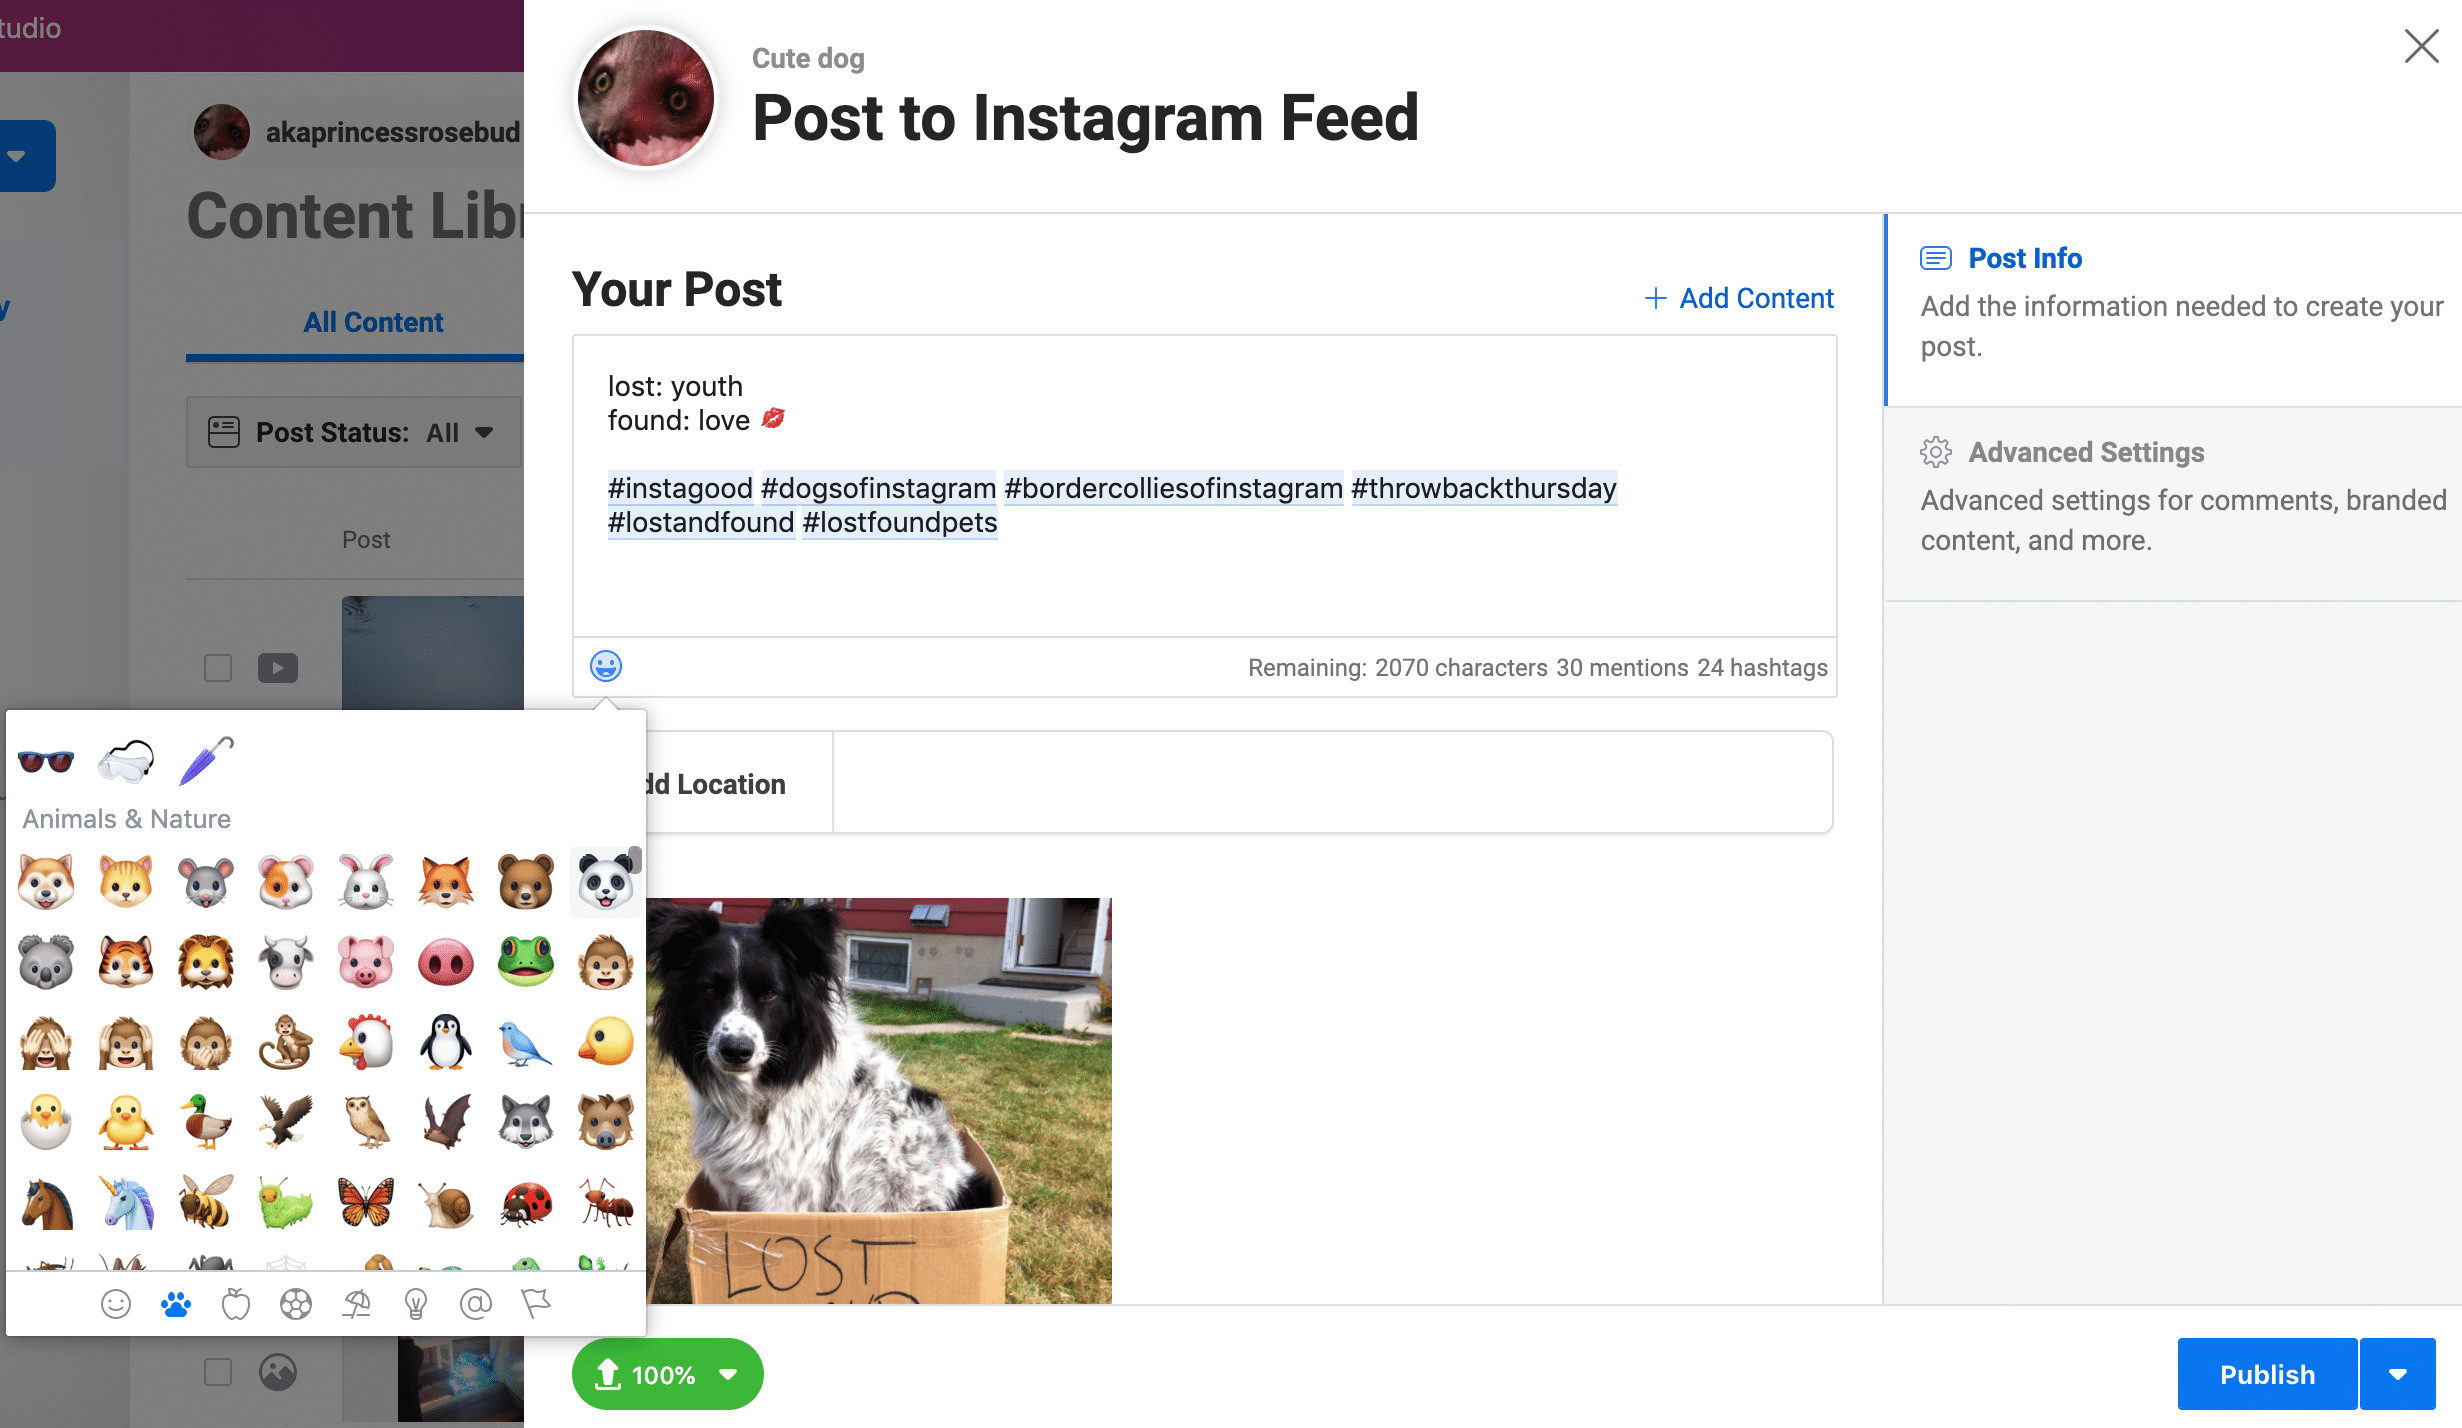
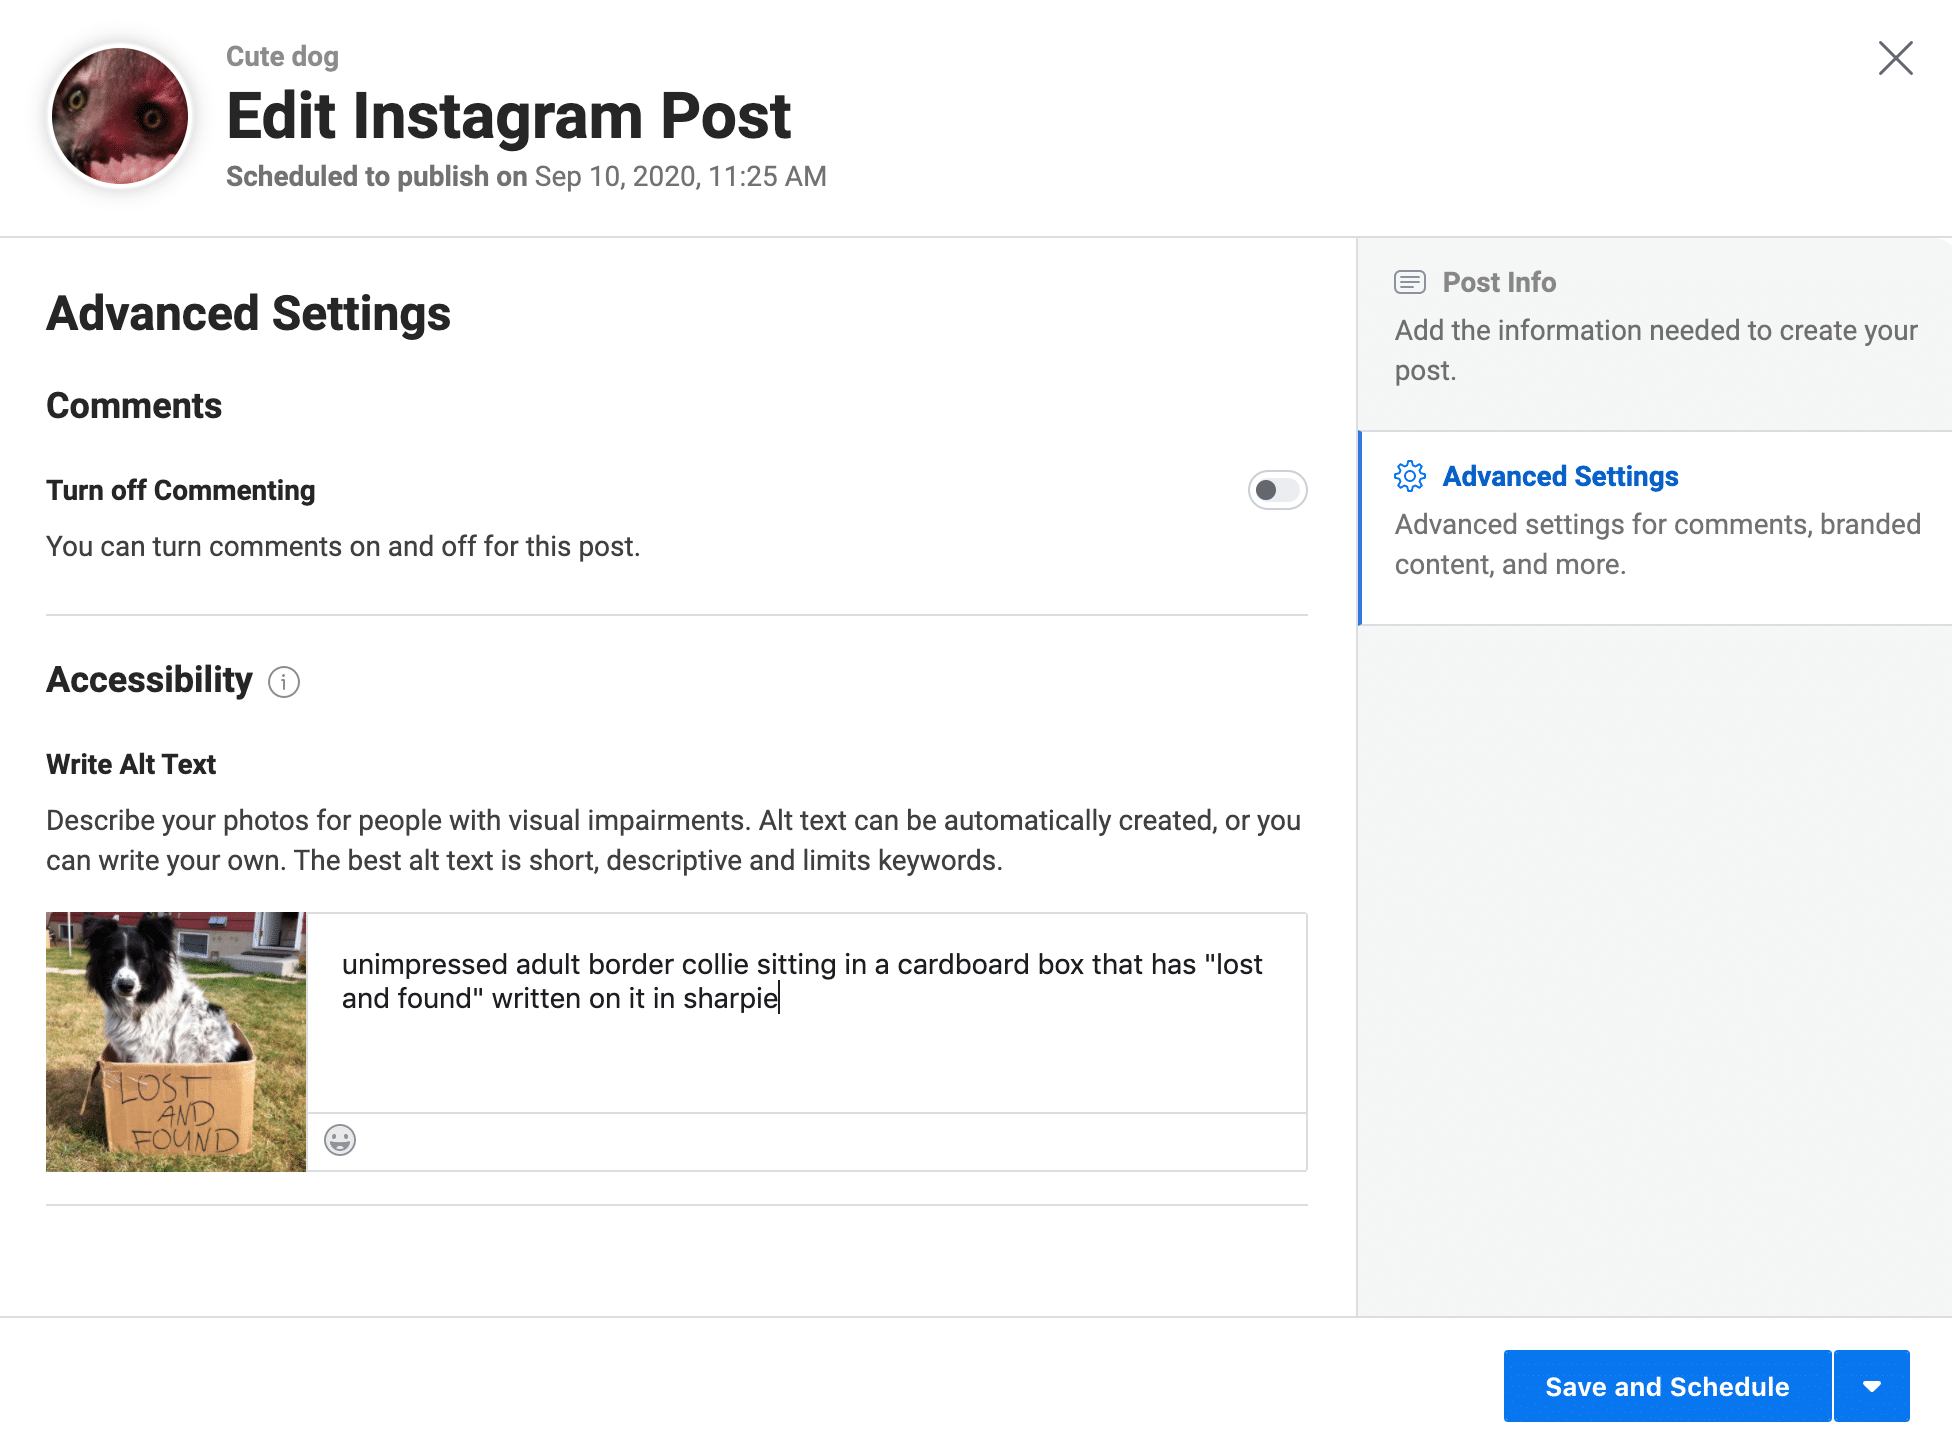
You can also click over to Advanced Settings to turn off comments and/or add some alt text for people with visual impairments:
5. Schedule your post
Now it’s time to schedule. In the lower right corner, click the arrow beside the blue Publish button, and select Schedule. (You can also click Publish Now or Save as Draft.)
Be warned that Creator Studio won’t give you much guidance as to the best time to post. You’ll want to check your own Instagram analytics to see when your audience is online, or read our industry-by-industry guidelines on the best time to post to Instagram.
That’s it! Now you can lean back and check your DMs.